Nodes
Overview
The Pulp Nodes concept describes the relationship between two Pulp servers for the purpose of sharing content. In this relationship, one is designated the parent and the other is designated the child. The child node consumes content that is provided by the parent node. It is important to understand that a child node is a complete and fully functional Pulp server capable of operating autonomously.
The following terms are used when discussing Nodes:
- node
- A Pulp server that has the Nodes support installed and has a content sharing relationship to another Pulp server.
- parent node
- A Pulp node that provides content to another Pulp server that has been registered as a consumer and activated as a node.
- child node
- A Pulp node that consumes content from another Pulp server. The child node must be registered as a consumer to the parent and been activated as a child node.
- node activation
- The designation of a registered consumer as a child node.
- enabled repository
- A Pulp repository that has been enabled for binding by child nodes.
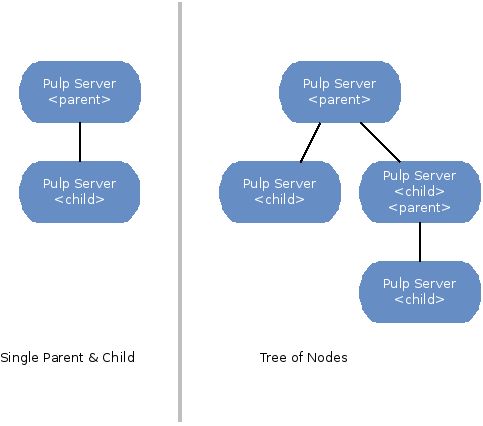
Node Topologies
Pulp nodes may be associated to form tree structures. Intermediate nodes may be designated as both a parent and a child node.
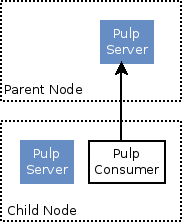
Node Anatomy
The anatomy of both parent and child nodes is simple. Parent nodes are Pulp servers that have the Nodes support installed. A Child node is a Pulp server with both the Nodes and Consumer support installed.
Authentication
The child node is authenticated to the parent node’s REST API using Oauth. The connection is SSL but no client certificate is required. The parent node publishes content which is downloaded (as needed) by the child node using HTTPS requiring client certificate that has been signed by the Pulp CA.
During installation of the Nodes packages, an x.509 certificate is generated and signed
using the Pulp CA (specified in server.conf) and stored in /etc/pki/pulp/nodes/node.crt.
The certificate is generated using /usr/bin/pulp-gen-nodes-certificate, which is provided
by the Nodes packages.
The node private key and certificate are sent to the child node at the beginning of each synchronization request to be used as the HTTPS credentials.
If the Pulp CA is changed after installation, administrators must regenerate the Nodes certificate using pulp-gen-nodes-certificate.
Installation
Since Pulp nodes are Pulp servers, the installation instructions for Nodes support assumes that the server installation has been completed. Next, follow the instructions below on each server depending on its intended role within the node topology.
Parent
To install Nodes parent support, follow the instructions below.
- Install the node parent package group.
$ sudo yum install pulp-nodes-parent pulp-nodes-admin-extensions
- The communication between the child and parent nodes is secured using OAuth. The parent node must have OAuth enabled and configured. Please see OAuth for instructions on enabling and configuring OAuth.
- Run
pulp-manage-db. - Restart server components.
Child
To install Nodes child support, follow the instructions below.
- Install the node child package group.
$ sudo yum install pulp-nodes-child pulp-nodes-consumer-extensions pulp-agent
- The agent on the child node uses the local pulp REST API which is secured using OAuth. The child node must have OAuth enabled and configured. Please see OAuth for instructions on enabling and configuring OAuth.
[oauth]
enabled: true
oauth_key: Xohkaethaama5eki
oauth_secret: eePa7Bi3gohdir1pai2icohvaidai0io
Warning
Do not use the key or secret given in the above example. It is important that you use unique and secret values for these configuration items.
- Edit
/etc/pulp/nodes.confon the child node and set the parent OAuth key and secret to match values found in/etc/pulp/server.confon the parent node. The user_id must be updated as needed to match a user with administration privileges on the parent node.
Warning
The keys in [parent_oauth] are key and secret, whereas the values in the
[oauth] section are oauth_key and oauth_secret. If you copy and paste from one
to another without altering the names of the keys then the child node will not be able to
communicate with the parent node.
[oauth]
user_id:  <EDIT: admin user on parent node>

[parent_oauth]
key:      <EDIT: matching value from parent /etc/pulp/server.conf>
secret:   <EDIT: matching value from parent /etc/pulp/server.conf>
user_id:  <admin user on parent node>
Example:
[oauth]
user_id: admin

[parent_oauth]
key: Xohkaethaama5eki
secret: eePa7Bi3gohdir1pai2icohvaidai0io
user_id: admin
- Run
pulp-manage-db. - Restart server components.
- Restart
goferd.
Admin Client Extensions
The admin extensions provide Nodes specific commands used to perform node administration which includes the following:
- Child node activation.
- Child node deactivation.
- List child nodes.
- Enable repositories for node binding.
- Disable repositories for node binding.
- List enabled repositories.
- Bind a child node to a repository.
- Unbind a child node from a repository.
- Initiate repository publishing of Nodes content.
- Initiate child node synchronization.
Install the Nodes admin client extensions.
$ sudo yum install pulp-nodes-admin-extensions
Enabling Repositories
In Pulp Nodes, there is a concept of enabling and disabling repositories for use with child nodes. Repositories must be enabled before being referenced in node bindings.
Repositories may be enabled using the admin client. See node repo commands for details.
$ pulp-admin node repo enable --repo-id <repo-id>
$ pulp-admin node repo disable --repo-id <repo-id>
Listing the enabled repositories can be done using the admin client. See: the node repo list
for details.
$ pulp-admin node repo list
Repository Publishing
After a repository has been enabled, it MUST be published before synchronizing content to child nodes. Publishing a Nodes enabled repository generates the data necessary for repository content synchronization with child nodes. If auto-publishing is enabled, a normal repository synchronization will result in publishing this data as well.
The size of the published data varies based on the number of content units contained in the repository and the amount of metadata included in each unit. Each published unit consists of a copy of the metadata and a symlink to the actual file associated with the unit. The metadata is stored as gzip-compressed JSON.
The Nodes information can be manually published using the admin client.
See: the node repo publish for details.
$ pulp-admin node repo publish --repo-id <repo-id>
Registration & Activation
Once the Nodes child support has been installed on a Pulp server, it can be registered to a parent server. This is accomplished using the Pulp consumer client. As mentioned, a child node is both a Pulp server and a consumer that is registered to the parent node.
On the child Pulp server:
- Edit the
/etc/pulp/consumer/consumer.conffile and set thehostproperty the to the hostname or IP address of the Pulp server to be use as the child node’s parent.
[server]
host = <parent hostname or IP>
- Register to the parent server as a consumer. This command will prompt for a password.
$ sudo pulp-consumer -u <user> register --consumer-id <id>
- Active the Pulp server as a child node. See: the
node activatecommand for details.
$ sudo pulp-consumer node activate
Binding To Repositories
The selection of content to be replicated to child nodes is defined by repository bindings.
Using the Nodes bind and unbind commands, users create an association between the
child node and Nodes enabled repositories.
Examples:
$ pulp-admin node bind --node-id <node-id> --repo-id <repo-id>
$ pulp-consumer node bind --repo-id <repo-id>
Child Synchronization
A child node’s repositories and their content can be synchronized with the parent. Technically, this action is seen by the parent as a content update on one of it’s consumers. But, for most users, the term synchronization is easier to grasp. During this process, the following objects and properties are replicated to the child node:
- Repositories
- description
- notes
- Distributors
- configuration (includes certificates and other credentials)
- Content Units
- metadata
- associated files (bits)
Strategies
During child node synchronization, named strategies determine how the synchronization is performed and what the desired effect will be. Strategies are incorporated at two levels during node synchronization.
The first is the node level strategy which determines how the collection of repository objects are synchronized. Depending on the selected strategy, repositories are created, updated or deleted to match the set of repositories to which the node is associated through bindings.
The second is the repository level strategy which determines how each repository’s content is synchronized. Depending on the selected strategy, content units are created, updated or deleted to match the content contained in the repository on the parent.
Current, there are two supported strategies.
- additive
- Results in objects present in the parent but not in the child being created or updated as necessary. This strategy should be used when objects created locally in the child should be preserved.
- mirror
- Results in objects present in the parent but not in the child being created or updated as necessary. Any objects present in the child that do not exist in the parent are removed. This strategy should be used when the desired effect of synchronization is for the child repositories to be an exact mirror of those on the parent.
The node level strategy is specified during node activation. Once activated, the strategy may be changed by performing a node deactivation followed by node activation specifying the desired strategy.
The repository level strategy is specified during node binding to a repository. Once bound, the strategy may be changed by performing an unbind followed by a bind to the repository specifying the desired strategy.
Note
The additive strategy is the default.
Running
The synchronization of a child node can be initiated using the admin client. This results in a request being sent to the agent on the child node which performs the update. A partial synchronization can be initiated by doing a regular repository synchronization on the child node. This will synchronize only the content of the repository.
The synchronization can be requested using the admin client. See: the node sync command.
$ pulp-admin node sync run --node-id <node-id>
Scheduling
Synchronization of a particular child can be scheduled with an optional recurrence. The
format for describing the schedule follows the Pulp standard for
date and time intervals. All commands related to the
creation, removal, and listing of node sync schedules can be found under the
node sync schedules command.
Quick Start
This assumes there are two Pulp servers up and running. The following steps could generally be
followed to get a basic Nodes parent and child setup going. To simplify the writeup, it’s
assumed that the parent server’s hostname is parent.redhat.com and it has a repository
named pulp-goodness that we want to share with our child.
On The Parent
On the Pulp server to be used as the parent node:
- Install the pulp-nodes-parent package group.
$ sudo yum install pulp-nodes-parent pulp-nodes-admin-extensions
Configure and enable OAuth.
Restart Apache. For upstart:
$ sudo service httpd restart
For systemd:
$sudo systemctl restart httpd
Enable the
pulp-goodnessrepository.
$ pulp-admin node repo enable --repo-id pulp-goodness
- Publish the
pulp-goodnessrepository.
$ pulp-admin node repo publish --repo-id pulp-goodness
On The Child
On the Pulp server to be used as the child node:
- Install the pulp-nodes-child package group.
$ sudo yum install pulp-nodes-child pulp-nodes-consumer-extensions pulp-agent
- Configure and enable OAuth. This should use different credentials from the parent for security.
- Edit
/etc/pulp/nodes.confand set the parent OAuth key and secret to match values found in/etc/pulp/server.confon the parent node.
[parent_oauth]
key:    <matching value from parent /etc/pulp/server.conf>
secret: <matching value from parent /etc/pulp/server.conf>
- Edit
/etc/pulp/consumer/consumer.confand change:
[server]
host = parent.redhat.com
Restart Apache. For upstart:
$ sudo service httpd restart
For systemd:
$sudo systemctl restart httpd
Restart the Pulp agent. For upstart:
$ sudo service goferd restart
For systemd:
$ sudo systemctl restart goferd
Register as a consumer. This command will prompt for a password.
$ pulp-consumer register --consumer-id child-1
- Activate the node.
$ pulp-consumer node activate
- Bind to the
pulp-goodnessrepository.
$ pulp-consumer node bind --repo-id pulp-goodness
Tips & Troubleshooting
- Make sure httpd was restarted after installing Nodes packages on both the parent and child.
- Make sure goferd was restarted after installing Nodes packages on the child.
- Make sure that Nodes enabled repositories have been published.
- Make sure that ALL plugins installed on the parent are installed on the child.